Emergency Water Damage And Restoration Process

If you’re frustrated by losing your property to water damage, here’s what you need to know about the emergency water damage and restoration process.

Discovering that water has caused damage to your home or property can leave you feeling frustrated, worried about the extent of the damage, and afraid that your property will never return to normal.

It is understandable, emergency water damage restoration technicians, some of whom have decades of experience, have worked with clients who were feeling exactly the same way.

When water damage occurs, time is everything. Whether it’s a burst pipe or flooding from a storm, immediate action is the only way to prevent severe damage and high repair costs.

It is important to quickly address water damage to prevent further structural damage. The good news is that emergency water damage restoration can remove the water, dry out the moisture that remains, and return your property to its previous condition.

Let’s focus on understanding water damage restoration and the emergency water damage and restoration process.

What is water damage restoration?

Water damage restoration is the process of returning the property’s condition to its original state before water intrusion. The process consists of inspection, extraction, and sanitation.

While water damage restoration usually does not require certification, in case it’s a matter of emergency, it should ideally be performed by a water damage Tucson specialist who is equipped with the right tools and knowledge to do so.

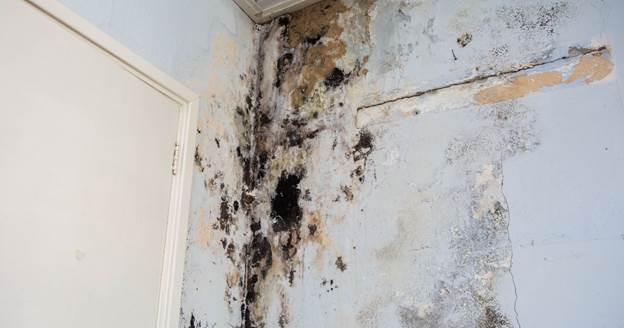
Signs of emergency water damage to walls and ceilings

  • Softened drywall that cracks or sinks inward when pressed
  • Discoloration, usually in the form of streaks that run down the walls
  • Water rings and stains
  • Flaking, stretching, and cracking paint
  • Musty odor

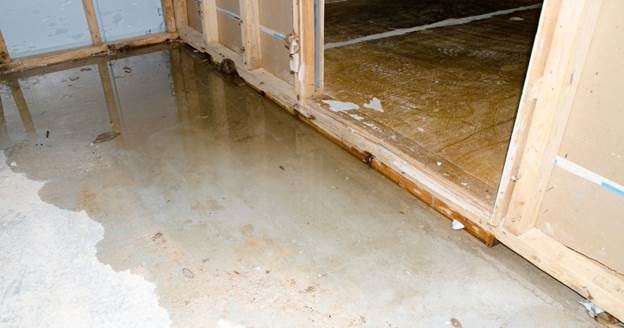
Signs of emergency water damage to floors

  • Discoloration
  • Unpleasant odor

Other signs of emergency water damage

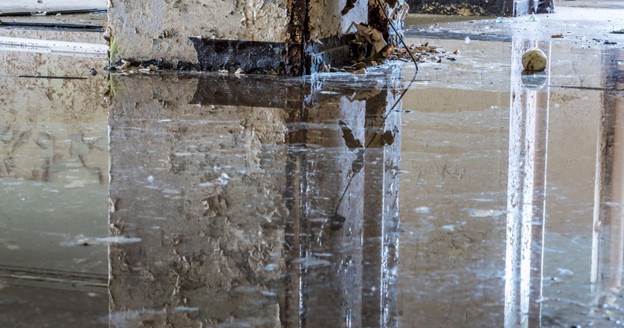
  • Pooling or standing water
  • Peeling wallpaper
  • Electrical issues
  • The sound of dripping or running water

Steps to Manage Emergency Water Damage

1. Shut down the source of water

When you discover that there is emergency water damage, the first thing you have to do is shut down the source of water. Stop the flow of water to avoid extensive damage to property.

2. Ensure the safety of life and property

While you shut down the water flow, causing emergency water damage, or perhaps even before, you must ensure that human lives are not at risk.

3. Assess and document the water damage

After you’ve shut down or stopped the flow of water, the next thing is to take a step back to carefully observe the extent of the damage that has been done by taking pictorial pictures of the spot or doing a video of the damage.

4. Informing The Right Authorities

Depending on the extent of the water damage, you may need to involve emergency water damage restoration authorities. Sometimes, if the situation of the damage is severe, professionals in the field is advisable for you to contact.

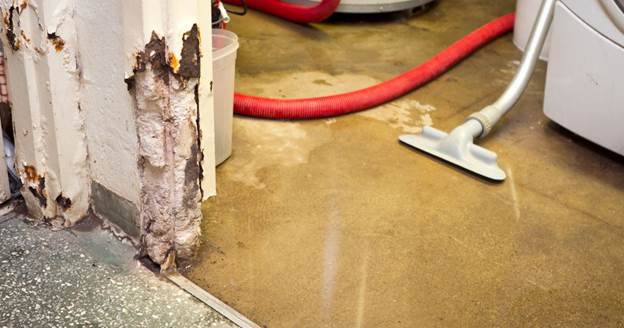
5. Extract the water

Instead of sweeping through the building for an extraction method could cause more damage than you think, but in some emergency water damage scenarios, such as extreme weather events, the water may drain naturally out of the building.

With small and contained spills, your maintenance crew may be able to mop or direct the water toward a sewage opening. However, if there’s too much standing water for your teams to manage using buckets and mops, you may require a commercial wet vacuum to manage water removal.

emergency water damage and restoration process

Water Damage Restoration Process

1. Conduct a Water Damage Inspection

A water damage inspection or water damage assessment is conducted by the specialist to identify the water source, the water contamination category, and the water damage class.

As discussed in a previous section, the water source is heavily related to the cause of water damage. However, in some cases, it may still be difficult to identify the water source, even while knowing the cause of water damage (e.g., flood water may seep into the property through multiple entry points).

After identifying and stopping the flow of the water source, the specialist will identify the water contamination category.

Identifying the water contamination category will help the specialist decide on the scope and type of decontamination needed later. The third part of the inspection is the identification of the water damage class.

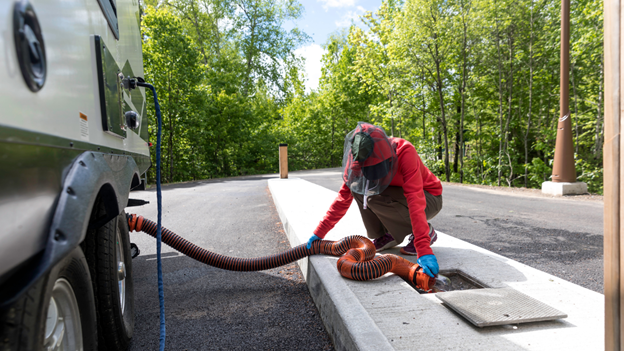
2. Remove Standing Water via Extraction

Especially crucial when a property has a flooded basement, removing the standing water (also known as stagnant water) is done through extraction. Extractors include industrial vacuums and submersible pumps.

3. Dry and dehumidify

Dehumidifiers will help remove the excess moisture from the air and promote evaporation as quickly as possible.

4. Sanitize and disinfect

Water damage can cause long-term health issues for tenants and visitors to your building due to the introduction of harmful bacteria and pathogens from the water intrusion event.

Treat the affected areas with disinfectants and mold growth prevention agents. Sanitize the environment before it can be approved for occupancy.

5. Repair and Reconstruct if Necessary

In the final part of water damage restoration, the specialist will remove unsalvageable parts (e.g., drywall below the flood line, low to medium density trim boards, carpet padding).

Carpets can be deep cleaned, though they will more than likely need to be replaced. In some cases, wooden trim boards may be reused, and drywall can be repaired.

emergency water damage and restoration process

Conclusion

Managing emergency water damage requires a well-coordinated and proactive approach. A swift response, expert restoration, and a focus on long-term prevention are key to minimizing damage, reducing downtime, and safeguarding the building’s structural integrity.

Prepare an emergency water damage management plan that includes a list of emergency contacts, procedures for shutting off the water supply, and recommended steps for managing emergency water damage.

Educate and train your teams in avoiding, detecting, and responding to emergency water damage events.

Preventing emergency water damage from water leaks with water damage Tucson

Dealing with a water damage incident is an experience best avoided, but when it occurs, emergency water damage restoration is crucial.

5 min read

How Long Does Water Damage Repair Take

How long does water damage repair take? Keep reading to find out.

Water damage repair timelines vary significantly depending on the extent of the damage, but generally range from a few days for minor issues to several weeks or even months for extensive damage that requires significant reconstruction.

Factors like the amount of water, the materials affected, and the speed of response all play a role.

Water damage can wreak havoc on a property, whether caused by a burst pipe, a leaking roof, or a natural disaster.

When faced with water damage, one of the first questions homeowners and property owners have been, “How long will it take to repair?”

Unfortunately, there is no one-size-fits-all answer to this question, as the time required to repair water damage can vary based on several factors.

In this guide, let’s explore how long a water damage repair takes.

How long does it take to repair the water damage?

It takes about 72 hours for areas affected by water damage to dry completely. But it only takes about an hour for the water to begin causing damage to your home.

Another thing to consider is that water damage can cause mold to spread the longer it’s allowed to sit.

The process and time required to repair water damage to your home can vary.

Factors such as the size of your home, flooring materials, number of affected areas, and more will impact the restoration timeline.

A small home damaged by a significant amount of water may take longer to repair than a large house that only suffered minor water damage.

It all depends on the situation you’re facing, but you can use some general guidelines to estimate how long the repair process will take. It takes about 72 hours for any affected areas to dry up completely; this applies on a room-by-room basis.

Larger areas affected by water damage need longer drying times. Regardless of the size of the affected area, you must follow specific protocols to restore your home’s interior quality completely.

While all the water may dry up within 72 hours, it can take several weeks to repair all the damage caused.

Assessing the Extent of Damage

The first step in repairing water damage is to assess the extent of the damage.

A professional water damage restoration specialist will evaluate the affected areas and determine the category and class of the water damage.

Categories range from clean water to heavily contaminated water, while classes indicate the severity and extent of the damage.

This initial assessment helps formulate an appropriate restoration plan and estimate the required repair time.

Water Extraction and Drying

After assessing the damage, the next crucial step is to extract and dry the water.

Depending on the volume of water and the affected surfaces, this process can take anywhere from a few days to several weeks. Powerful pumps, wet/dry vacuums, and specialized equipment efficiently remove excess water.

Once the standing water is removed, dehumidifiers and industrial-strength fans thoroughly dry the affected areas.

Mold Remediation

Mold growth is a common consequence of water damage. Mold can start to grow within 24 to 48 hours after exposure to water, posing serious health risks and further complicating the restoration process.

Mold remediation is a crucial step that involves identifying and eliminating mold growth. The time required for mold remediation depends on the extent of the infestation.

In some cases, removing and replacing affected building materials may be necessary, which can extend the overall repair timeline.

how long does water damage repair take

Repair and Restoration

Once the affected areas are dry and mold-free, the repair and restoration process for water damage can begin.

This stage involves repairing or replacing damaged structures, such as drywall, flooring, or electrical systems.

The time required for this phase depends on the complexity of the repairs, the availability of materials, and the size of the affected area.

In some cases, extensive restoration work, such as repainting or refinishing, may be necessary. The restoration team will diligently restore your property to its pre-damaged condition, ensuring functionality and aesthetic appeal.

Factors Affecting How Long Water Removal Takes In The Water Damage Repair Process

Unfortunately, since every property and every occurrence are distinctive, removing and repairing water damage isn’t always an easy task.

Hence, whether it’s a broken pipe, a leak, or a flood caused by bad weather, the amount of time required for a successful water removal and repair can vary.

Three primary factors determine the time needed for successful water damage removal and repair.

Water Type

Determining the length of time for water removal and repairs will also depend significantly on the type of water involved in the scenario.

Three primary forms of water can be involved in a water damage emergency, and each can require different amounts of time to clean up.

Water directly from the pipes is considered clean water. Since it poses the least risk, clean water can be cleaned up the quickest and easiest.

The water that exits from your house’s sinks and showers is known as gray water. The presence of contaminants in gray water, such as soap residue and dirt, could require extra cleaning measures.

Sewage and plumbing are considered black water. It will take longer to address black water because it requires specialized tools and expertise.

Damage Extent

The duration of the water removal and repairs will depend on the extent of the damage, as not all water damage is the same.

There are instances when a leak ruins the flooring’s surface. In other cases, a pool of water may seep in and have a more profound effect.

The length of time the water remains in the damaged area usually determines the extent of the damage.

A building’s drywall, flooring, and wood structural elements can all start to seep into the ground if there is standing water nearby. Water can even destroy the foundation in severe circumstances. The possibility of mold growth also rises after just twenty-four hours.

Nevertheless, the cleaning process will take longer if the water has been left to sit for an extended period. To minimize structural damage and the time needed for cleanup, you must act quickly.

how long does water damage repair take

Affected Area’s Size

The size of the affected area must be taken into account when determining the time required for water damage removal and restoration. Drying out larger areas will take longer.

It will also depend on how you organize the room. Largely structured areas or places with extra drywall structures will typically take longer to dry than open areas.

Conclusion

The duration of water damage repairs can vary significantly based on factors such as the extent of the damage, the type of water involved, the presence of mold, and the complexity of the restoration work.

While providing an exact timeframe without assessing the specific situation is challenging, it is essential to address water damage promptly to prevent further deterioration and mitigate potential health risks.

Searching for water damage restoration near me is actually what you need to solve your problem, as they will ensure that the process is efficient and effective, reducing the overall repair time and helping you get your property back to normal as soon as possible.

6 min read

What Are the Average RV Repair Costs

“If you have ever been faced with the question what are the average RV repair costs, this post answers that question to help you make the most of your journey.”

average rv repair costs

Every new RV owner hears the same warning repeated throughout the start of their journey. RVs require a lot of maintenance, and that’s a truth, but another thing to consider is the amount of maintenance.

With over 11.2 million RV-owning households and a staggering 62% increase in ownership over the last two decades, understanding maintenance costs has never been more critical. New and experienced owners need to understand potential repair expenses to protect their investment when seeking RV repair Paso Robles CA.

This post will help you understand the average rv repair costs, the factors that affect the cost, what to expect, how much to budget, and when it’s worth calling in the pros because sometimes DIY just won’t cut it.

How Much Do RV Repairs Cost?

average rv repair costs

First, it is essential to understand that RV repair costs vary significantly; therefore, we should examine them before proceeding.

  • RV Type: Class A motorhomes, being the largest and most complex, tend to have the highest repair costs. Class B and C motorhomes, along with travel trailers and fifth wheels, have varying costs depending on their size and features.
  • Age and Brand: Older RVs, especially those with specialized or discontinued parts, may be more expensive to repair due to the difficulty of sourcing parts. Luxury brands, due to their sophisticated components, can also lead to higher repair bills. 
  • Type of Issue: Mechanical repairs (engine, transmission, etc.) are often more costly than electrical or cosmetic repairs. Plumbing issues, especially those involving fresh or wastewater systems, can also be expensive. 
  • Location: Labor rates vary significantly by region, so the cost of repairs in California, for example, will likely differ from those in Tennessee. 
  • Parts and Labor: The cost of replacement parts and the labor required for the repair will also impact the overall price. RV parts cost more than regular automotive parts. Some repairs may require specialized parts that are difficult to find and expensive to order. 
  • Slide-outs: While convenient, slide-outs can be a major source of repair costs due to their mechanical and electrical complexity. 

For instance, a minor leak might cost a few hundred dollars to fix, while a complete engine repair could easily run into the thousands. Similarly, slide-out maintenance can range from a few hundred to several thousand dollars. 

Having said that, average RV repair costs can vary widely, from a few hundred dollars for minor issues to tens of thousands of dollars for major repairs.

Here’s a breakdown of potential repair costs:

  • Engine and Mechanical: Engine repairs can range from $1,400 to $30,000, while transmission repairs can cost between $1,900 and $12,000. 
  • Plumbing and Water Systems: Your RV’s plumbing relies on a pressurized freshwater system. This system requires a pressure between 40 and 60 PSI for everything to work correctly. When you notice changes in water pressure, that’s your first warning sign that something needs attention.

Simple leaks might cost a few hundred dollars, but more complex issues, such as water heater replacement, can exceed $1,000. 

  • Electrical Systems: Your RV operates on 12-volt DC power for essential functions and 120-volt AC power for bigger appliances. The converter/charger connects these systems, ensuring battery charge levels are maintained for dependable performance. Electrical repairs can range from $150 to $2,500+, depending on the complexity. 
  • Roof Repairs: Water damage spreads silently. A small leak today could lead to mold and structural rot in a few months. Roof repairs can cost from $500 to $5,000 or more, especially for complete replacements. 
  • AC and Heating: Modern RV air conditioning units utilize R-410A refrigerant, which functions at elevated pressures compared to older R-22 systems. This increased pressure enhances cooling efficiency but demands diligent maintenance. Repairs for these systems can range from $200 to $1,500. 
  • Slide-outs: Slide-outs enhance the living area of your RV, but they can encounter mechanical problems as time goes on. These systems depend on accurate alignment and consistent upkeep to operate effectively. These can be expensive, with repairs ranging from $1,000 to $3,000. 
  • Leveling Systems: Repairs for leveling systems can range from $500 to $2,000. 
  • Waste Systems: Waste system repairs can cost between $400 and $3,400. 

So, to answer the question, what are the average RV repair costs? I would say the best answer is to expect to spend anywhere from $500 to $2,000, depending on the nature of the problem.

How to Reduce Your RV Repair Costs

average rv repair costs

No one can avoid every breakdown, but there are ways to keep costs low:

Have a Maintenance Schedule

You know that saying “prevention is better than cure”? Well, that applies to your RV as well. It helps to do whatever you can to ensure you don’t have to make any repairs at all.

Make it a part of your travel day routine to always change your oil, flush your water system, check the roof seal, and inspect batteries and tires regularly.

You can check your RV owner’s manual for a detailed list of maintenance tasks, and consider setting a reminder to monitor those tasks and their deadlines to ensure you never overlook any.  

Some maintenance tasks you should look forward to are:

  • Changing engine oil
  • Testing and maintaining brakes
  • Flushing water heaters and maintaining water systems
  • Testing battery voltage and topping off fluids
  • Cleaning and lubricating slide-outs and awnings

Warranty and Insurance

Of course, something is likely to malfunction, spoil, or break even if you adhere to the strictest maintenance routine. When that occurs, the most cost-effective method to get a repair done on your RV is to have someone else cover the expenses.

This is where your RV warranty and/or insurance becomes useful. Some repairs could be included under one or both of these options.

Before you spend your own money on any repairs, it’s important to review what your RV warranty and insurance will cover to prevent unnecessary out-of-pocket expenses.

Basic DIY Repairs

If you don’t have a warranty or insurance, or if these things do not cover a repair, you will need to consider other options. The next cheapest way to get something fixed on your RV is to do it yourself.

You can agree with me that labor is extremely expensive when it comes to RV repairs, and leaving your RV in a repair shop for weeks adds to the cost because you now have to consider accommodations elsewhere.

I’ve attempted certain RV DIY projects using online tutorials with absolutely no prior experience, and I can tell you, it wasn’t bad.

So, I can attest that it is actually possible for someone with no repair skills to tackle a good number of RV projects on their own as long as you put your mind to it.

Have Backup Plans

Even if you keep up with all the maintenance and learn to do all the basic repairs in the world, there will almost certainly come a time when your RV needs some major repair. Having plans in place for these repairs will help you feel more secure and will help make unexpected issues a little less scary:

You can have an emergency plan for your RV repair. You can create a savings account specifically dedicated to RV repairs and contribute to it on a monthly or weekly basis so that when repair costs arise, they don’t hurt us financially.

Conclusion

average rv repair costs

It is important to note that these expenses can differ depending on how often you use your RV. Those who live in their RV full-time would likely have higher maintenance costs compared to those who camp occasionally on weekends, as their equipment undergoes more frequent wear and tear.

The cost of RV repair and maintenance can vary depending on the type of repair, the age of your RV, and other factors. 

If you need professional help, I recommend hiring The Mobile RV Repair Company. They’ve built a reputation for honest pricing and expert work across all types of RVs.

Whether it’s a minor fix or a full-scale breakdown, they understand your rig, your lifestyle, and how to get you back on the road without the headache.

7 min read

Why Aluminium Windows And Doors Are Worth The Money

Aluminium lasts longer and looks better too. Here’s why aluminium windows and doors make sense if you care about quality, style, and fewer repairs.

I used to think all windows and doors were the same.

As long as they opened and closed, I didn’t care what they were made of. But then I bought a place that had wood frames.

And man… the upkeep? Constant.

Paint peeling, warping in the rain, and every season brought a new problem.

That’s when I started looking into why aluminium windows and doors are so popular.

And let me tell you—there’s a reason more people are switching.

So, if you’re stuck wondering what kind of material to go with, stick around.

I’ll walk you through it like we’re just having coffee and chatting about real-life home stuff.

What’s So Special About Aluminium?

Okay, so here’s the thing—aluminium windows and doors don’t just look nice. They hold up.

And that matters when you’re spending good money on your home.

Let me break it down.

Here’s why aluminium makes sense:

  • No more warping: Unlike wood, aluminium doesn’t bend or swell when it rains or gets super hot.
  • Low maintenance: You don’t need to repaint it every year. Just wipe it clean and move on with your day.
  • Long-lasting: This stuff doesn’t rust like other metals. It stays solid for years.
  • Slim frames, more glass: Want more sunlight? Aluminium frames are thinner, which means more natural light.

That’s already a win in my book. Especially when you think about how much it costs to keep fixing or replacing older frames.

What About the Look?

I get it—you want your house to look good, too. We all do.

And honestly? Aluminium windows and doors just look clean. Sleek. Modern.

But not too fancy that it feels cold. You can get them in different colors and styles to match your home, whether you live in a condo or a cozy family house.

They also fit better with modern builds. So if your home has a more updated look or you plan to remodel, aluminium just works.

Energy Bills Are No Joke

Now, I used to roll my eyes a bit when people talked about “energy-efficient” windows.

I figured all windows were the same. Until I got my heating bill in January.

Let’s just say—it hurt.

That’s when I found out aluminium windows can help you save energy—but only if you get the right ones.

Look for these features:

  • Double-glazed or triple-glazed glass
  • Thermal breaks (keeps the metal from getting too hot or cold)
  • Tight seals to keep drafts out

When these things are done right, your AC and heating don’t have to work as hard. That means lower bills and a cozier home.

Check out this Energy Star guide if you want more info on what to look for in energy-efficient windows and doors.

It breaks it down in plain terms.

What If You’re Replacing Old Ones?

why aluminium windows and doors

If your windows are leaking, creaking, or just plain ugly, it’s time to think about windows replacement or even door replacement.

Trust me, I waited too long on this, and it cost me more in the long run.

You don’t need to go all out and replace everything in one go (unless you want to). You can start with the worst spots and work your way through.

Here’s how to tell when it’s time:

  • You feel cold air coming in even when the window’s closed.
  • You hear way too much noise from outside.
  • The frames are cracked, chipped, or pulling away from the wall.
  • Your energy bills keep going up.

Sound familiar? Then you probably need some windows replacement or door replacement soon.

Looking for a Good Windows Company?

Okay, I’m gonna be real here—not all installers are the same. Some just want to rush through the job and be done.

But when you’re spending money on quality frames and glass, you want it done right.

If you’re in Ontario and need windows and doors, I’ve heard great things about this windows company.

They serve windows Oakville and nearby areas, and people say they’re solid—honest, fair, and know what they’re doing.

Don’t just take my word for it, though. Always ask questions like:

  • How long have you been doing this?
  • Do you offer warranties?
  • Can I see examples of your past work?

Good installers don’t mind showing you proof.

Can I Get Help Locally?

If you’ve been searching for things like “windows near me” and feeling overwhelmed, I’ve been there, too.

Local businesses can be hit or miss.

But sometimes, local companies actually care more. They rely on word-of-mouth, so they want to do a good job the first time.

Here’s what I do when I need help:

  • I check Google Reviews.
  • I call and ask how they’d handle my house, not just in general.
  • I ask for a quote and compare it with 1–2 others.

Don’t feel bad about asking. This is your money, your home.

Also, the Government of Canada’s website has helpful tips if you’re doing energy upgrades.

They even offer rebates sometimes, so that’s worth checking out.

Cost Talk—Is Aluminium More Expensive?

Let’s not pretend it’s cheap. Aluminium windows and doors can cost more upfront than vinyl or wood.

But here’s the thing…

You’re not paying for one year. You’re paying for 20+ years.

Here’s how I look at it:

  • Wood might look nice, but it needs repainting every few years.
  • Vinyl is cheaper, but it can crack in cold weather.
  • Aluminium? It just lasts. And looks good while doing it.

So yes, it might cost more now. But in five years, when your neighbors are repainting their frames again and you’re just chilling with your coffee, you’ll be glad you paid a little more.

Should You Replace All at Once?

Honestly? It depends on your budget.

Here’s what I did:

  1. I started with the worst ones—the ones leaking or cracked.
  2. Then saved up and did the rest a few months later.
  3. I kept the same style and frame color, so everything still matched.

You can do it bit by bit. Just make sure you get a good installer who can help you plan it out.

Conclusion: Are They Worth It?

If you’ve ever wondered why aluminium windows and doors get so much love—it’s simple. They just work better and last longer.

Yes, it’s a bit more money at first. But what you get back in savings, comfort, and peace of mind? Totally worth it.

Here’s a quick recap:

  • They don’t warp or rust.
  • They’re easy to clean and last a long time.
  • They help with energy bills if installed right.
  • They look great, especially if you like clean, modern lines.
  • You can find good help locally by digging a bit.

I used to think I’d just “make do” with what I had. But once I switched, I realized how much better it could be.

No more drafts. No more noise. No more stress.

So yeah, if you’re thinking about it, I say go for it. Take your time, get a few quotes, and don’t let anyone rush you.

But when you’re ready? You’ll be glad you did it.

7 min read